Install Mac OS X El Capitan on VirtualBox
First, what you are going to do is download the VirtualBox for Windows from its website. Once you have downloaded the VirtualBox, then install it on your computer. If you run VMware or Hyper-V so, you should not use them at the same time. Because you can not run two different Virtualization software on one PC. Because one Virtualization software you can use at the same time.
Step #1. Extract OS X El Capitan Image File
To extract Mac OS X El Capitan image file, you have to navigate where the image is located. For this task, you need an extractor like (WinRar or 7Zip). Right click on the image file then choose “Extract Here“.
Step #2. Install VirtualBox on Your PC
Download VirtualBox from the link above. Once you have downloaded the VirtualBox, then Install it on your Windows PC. To install VirtualBox, click on the setup then hit next and next. Finally, click “Finished”.
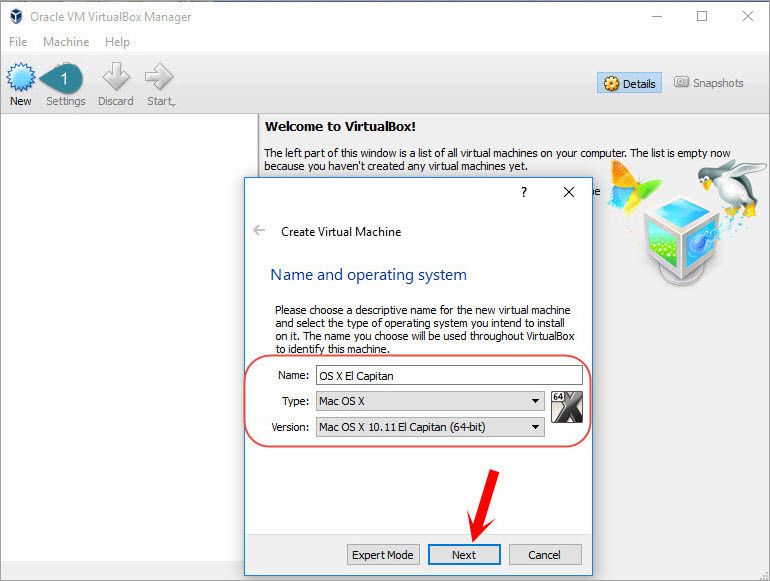
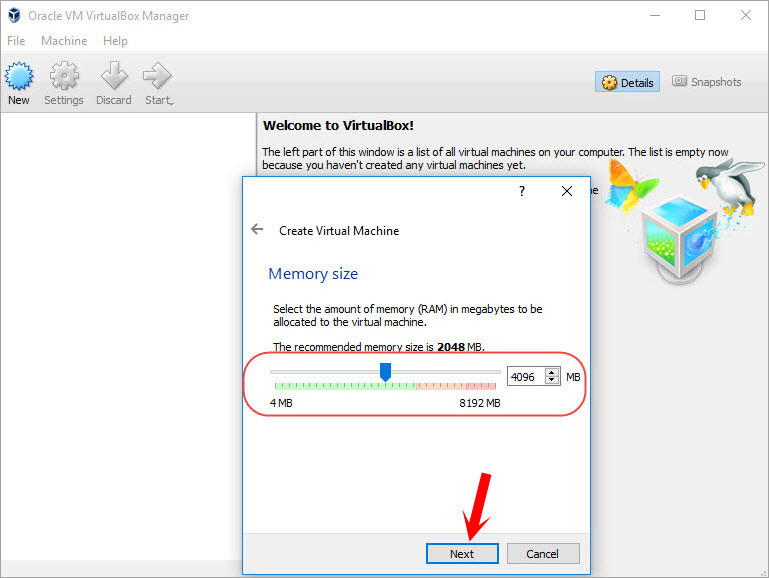
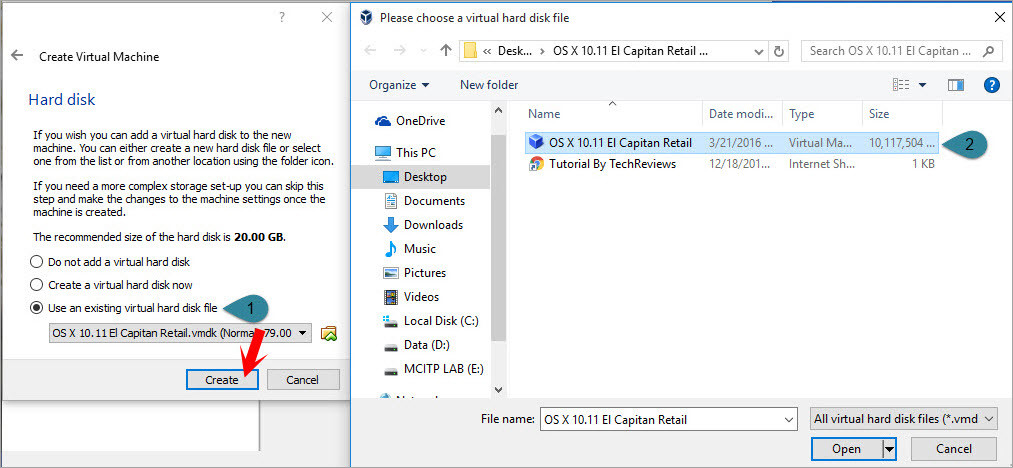
Step #3. Create a New Virtual Machine
#1. Now, you have to create a new Virtual Machine. Open the VirtualBox then tap on “New” at the upper left-hand side and name the Virtual Machine “OS X El Capitan“. #2. When you clicked next, then a new window will pop up. Choose at least 2 GB of RAM space for the Virtual Machine. #3. On the Hard Drive window, select the last option “Use existing virtual hard drive file” then tap on the folder icon and select the Mac OS X El Capitan image file.
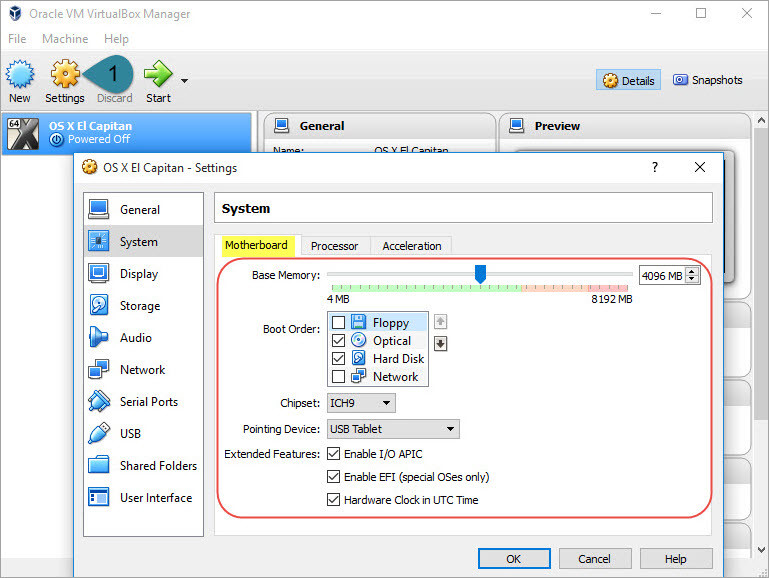
Step #4. Edit Created Virtual Machine
#1. Open the VirtualBox then tap on “Settings“. In the “General Tab“, put everything to the default. Go to the next option “System“. You will see three primary tabs. Click on the first tab “Motherboard“. Setting everything like the screenshot below. Also, set the Processor to 2 CPUs. #2. Go the “Network option” then choose an appropriate network adapter.
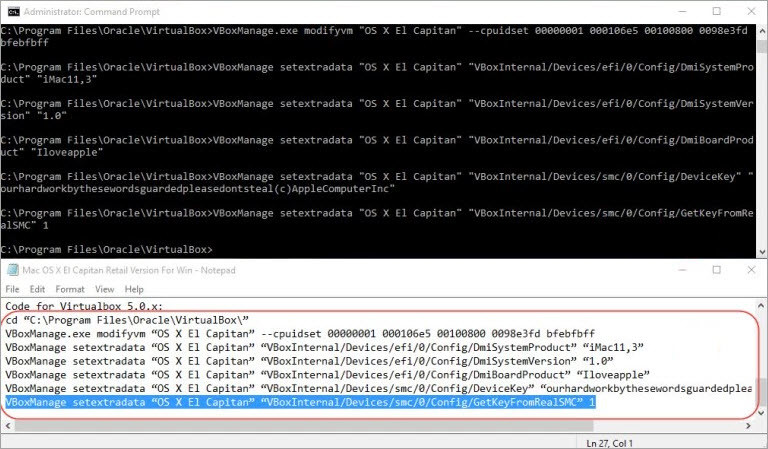
Step #5. Execute VirtualBox code
Copy and paste this code to your command prompt. Follow the instructions closely. First, replace the “OS X Name” with your Virtual Machine name. Click the link below to download VirtualBox code. Download VirtualBox Code Now, run CMD as administrator. Copy and paste each code to the cmd. If you have downloaded the VirtualBox version 5 so, you need the code for version 5. If you are using version 4 of VirtualBox, so you need the code for version 4. If you didn’t understand this step, put a comment down below this post.
Step #6. Install Mac OS X El Capitan on VirtualBox
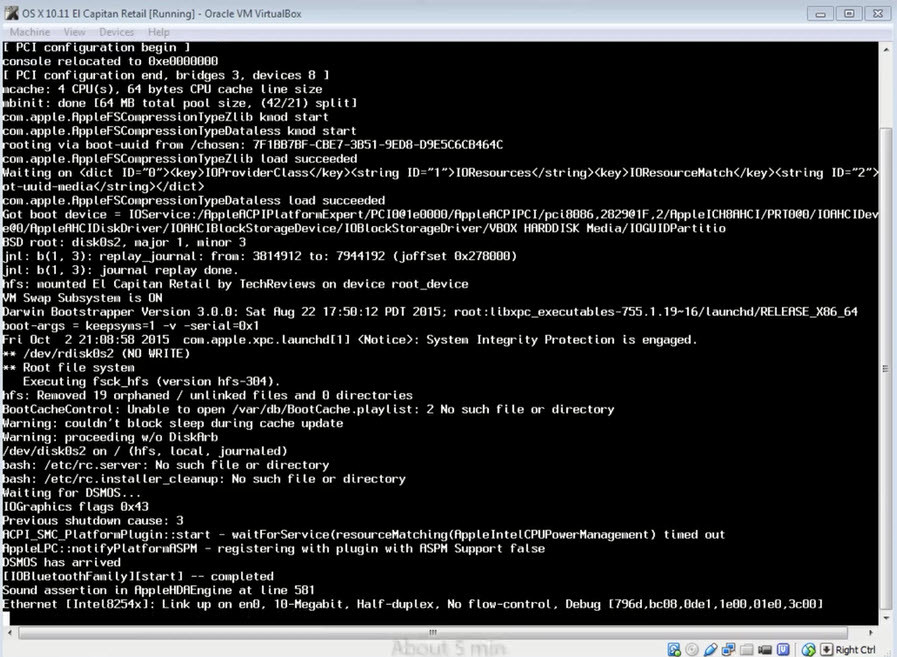
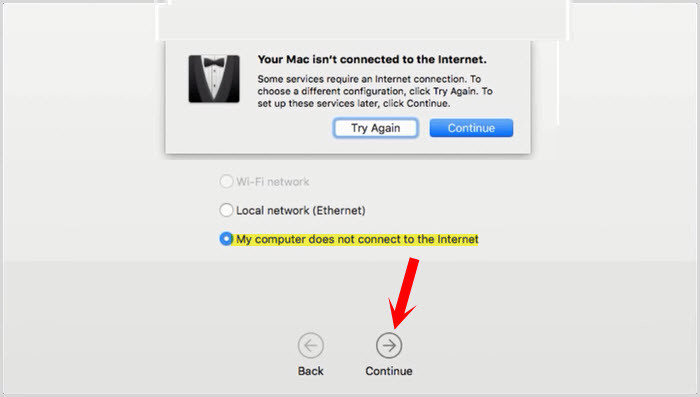
#1. Now, everything is ready for installation of Mac OS X El Capitan on VirtualBox. Run VirtualBox then click on the “Start” button at the top. #2. Right after tapping on the start button, then some code will be loaded. Don’t worry about those laws. After this step, it’s elementary and straightforward. You have to create a new user account. Read how to install Mac OS X El Capitan article. But again here, we will show you how to create a new user account on Mac. #3. Choose the keyboard and Language then click the “Continue” button. #4. Select the last option “My computer does not connect to the internet”. Some Service requires an internet connection. To select a different configuration, click try again. To process with this setting. Click “Continue“. #5. In the transfer information to this Mac window, you have three options to select. But here you have to select the last option “Don’t transfer any information now”. Hit the continue button. If you want to enable the location services, check the enabled service on this Mac. But I don’t want to enable location service. Click continue. #6. Read the terms and conditions of the Mac OS X Software License Agreement then tap on the “Agree” button. Now, feel the user account information. Type full name, account name, password, and hint. Select the time zone and hit the continue button. Uncheck the diagnostics & usage then hit the continue button. It’s done! Now you can start using Mac OS X El Capitan on VirtualBox on the Windows operating system. Important: For any kinds of fixing errors while installing Mac OS X El Capitan and macOS Sierra visit these articles.
Complete Guide to Fix VirtualBox Errors While Installing Mac OS X How to Fix macOS Sierra or El Capitan Screen Resolution on VirtualBox?
wikigain recommended articles:
How to Perform A Clean Installation of Mac OS El Capitan? How to Dual Boot Mac OS X El Capitan with Windows 10? Reset Forgotten Mac OS X El Capitan Password Change Mac OS Screen Color to Grayscale Mode How to Install Mac OS X El Capitan on PC? How to Install Mac OS X El Capitan on PC Using UniBeast?
Conclusion
Installing Mac OS X El Capitan on VirtualBox is somehow tricky, so read the article very carefully. If you make a mistake, so you will not be able to install Mac OS X El Capitan on VirtualBox. Again if you have got any question regarding this article “How to install Mac OS X El Capitan on VirtualBox on Windows”, so feel free to hit a comment below this post. We will response it as soon as possible. Thanks for being with us.